2. Your First Take
Quick Listen is the fastest way to measure a watch. Put it on the microphone and press one button. There is no watch to set up first. This chapter walks through it once, from installing the app to saving the take.
What You Need
- The app for your computer, from the Releases page. Installing and updating has the details for macOS, Windows and Linux.
- A timegrapher microphone: a contact microphone in a watch holder. An ordinary microphone often hears the loud drop but misses the quiet unlock, so rate works and amplitude doesn’t.
- A mechanical watch with a Swiss lever escapement, fully wound.
- Its calibre, if you know it. The calibre gives the lift angle, which amplitude needs.
Install and Open
- macOS: open the disk image and drag the app to Applications.
- Windows and Linux: extract the whole download and run the app from that folder. Keep its files together.
- The builds aren’t signed, so the system may ask you to approve the first launch. Allow microphone access when asked.
Set Up the Microphone
The first time the app opens, it asks you to set up the microphone. It starts listening at once, so you can see the watch as you set it up.
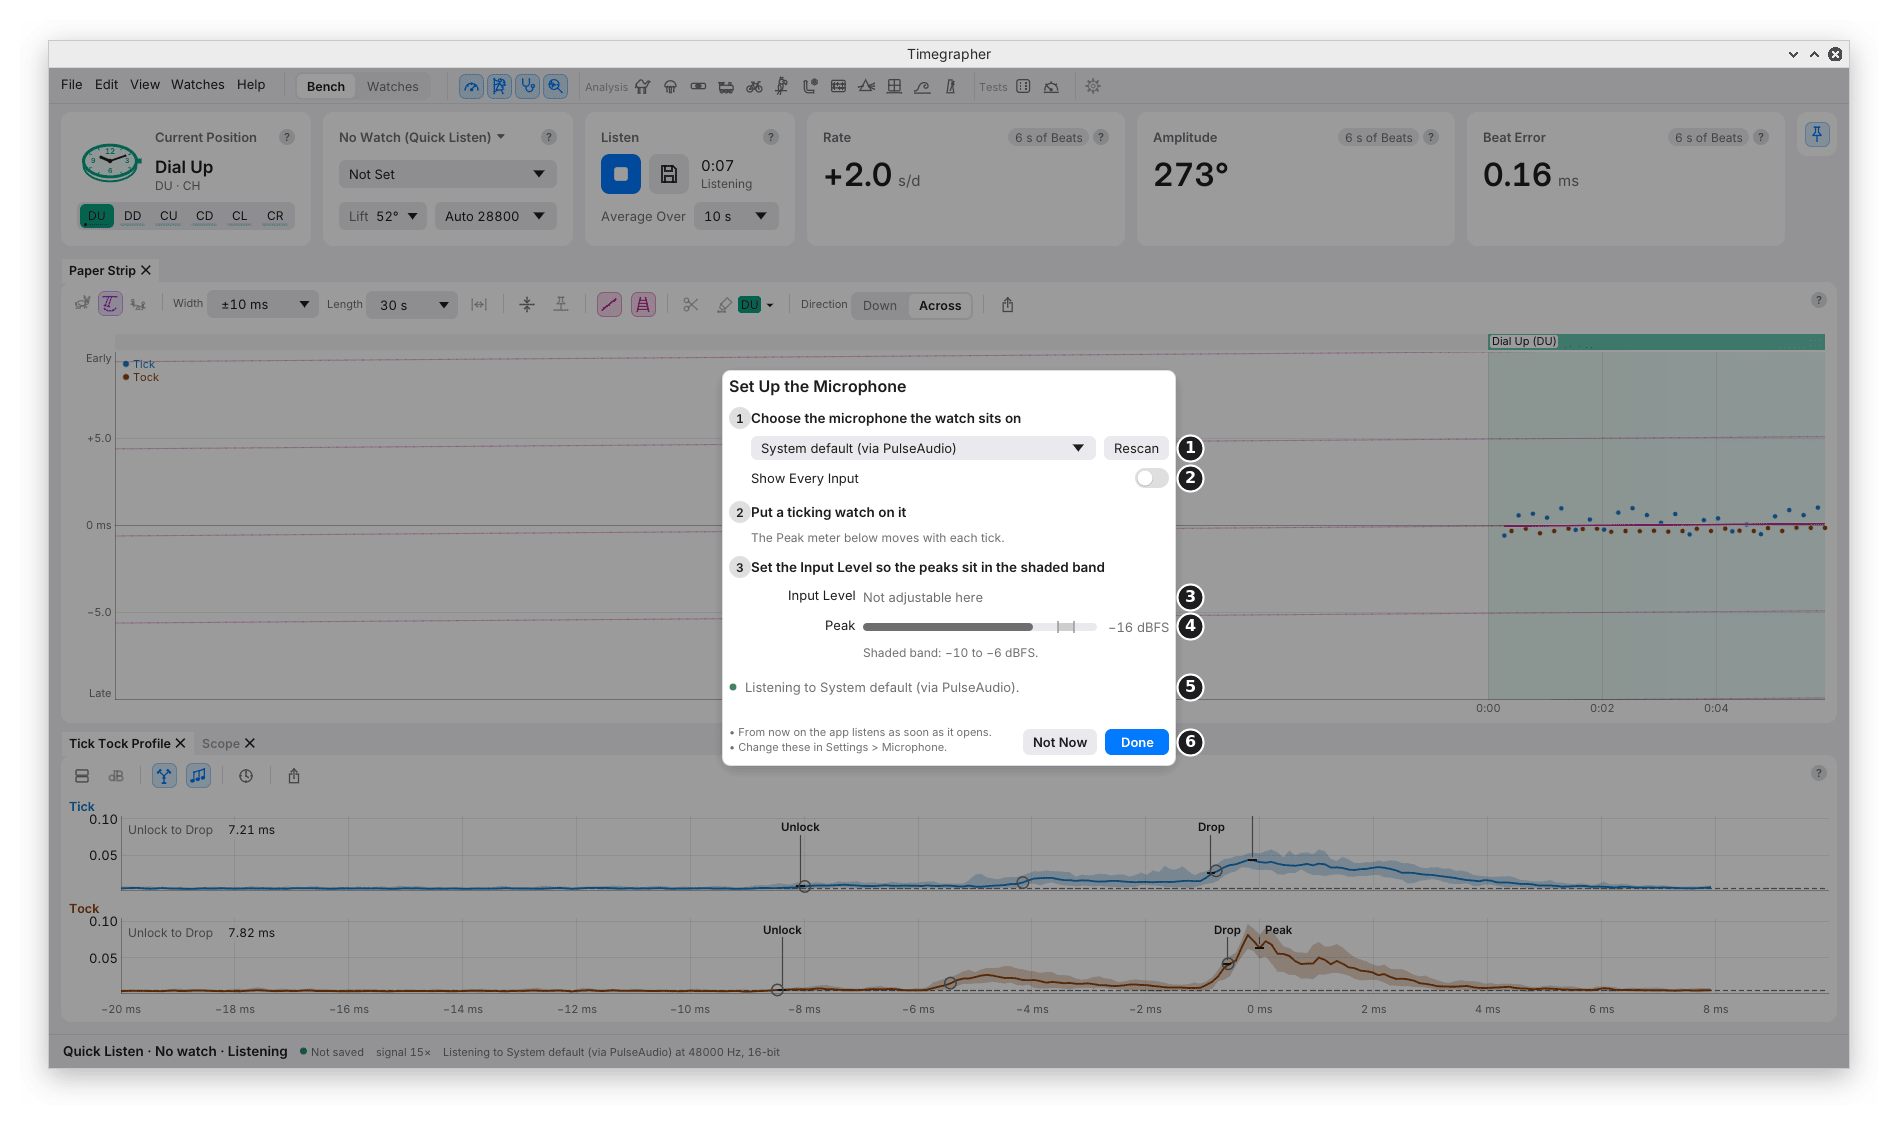
| Mark | Control | What it does | Why you’d use it |
|---|---|---|---|
| 1 | Microphone menu and Rescan | Picks the input to listen to. Rescan looks for inputs again. | To pick the microphone the watch sits on. Rescan after plugging one in. |
| 2 | Show Every Input | Lists every input the system offers, with its id. | When your microphone is missing from the short list. |
| 3 | Input Level | The microphone’s gain, where the app can set it. | To bring the peaks into the shaded band. |
| 4 | Peak and its shaded band | How loud the latest ticks reach, against −10 to −6 dBFS (decibels below the loudest the input can record; chapter 3). | Peaks in the band are loud enough to time the quiet unlock, with room to spare before clipping. |
| 5 | Status line | What the app is doing, or why the input failed. | To see at once if the input won’t open. |
| 6 | Not Now and Done | Done keeps listening, and from then on the app listens as soon as it opens. Not Now stops listening, and the sheet doesn’t come back by itself. | Done for a microphone you’ll use every day. |
- In this picture the sound comes from a recording played through a virtual microphone, so Input Level reads “Not adjustable here” and the peak sits below the band. On your microphone, raise the level until the peaks sit in the band.
- You can change all of this later in Settings > Microphone. Setting Up the Microphone explains each control.
Listen
- Put the watch on the holder, dial up. Make the contact firm and repeatable. Stop a loose bracelet rattling against the holder.
- Look at the Listen card. If it shows ■ Stop, the app is already listening. If it shows ▶ Listen, press it to start.
- Wait about half a minute. The first readings come after a few seconds of beats. They steady as more beats arrive.
- Leave the watch and the table alone. A knock shows as a jump.
What to Read First
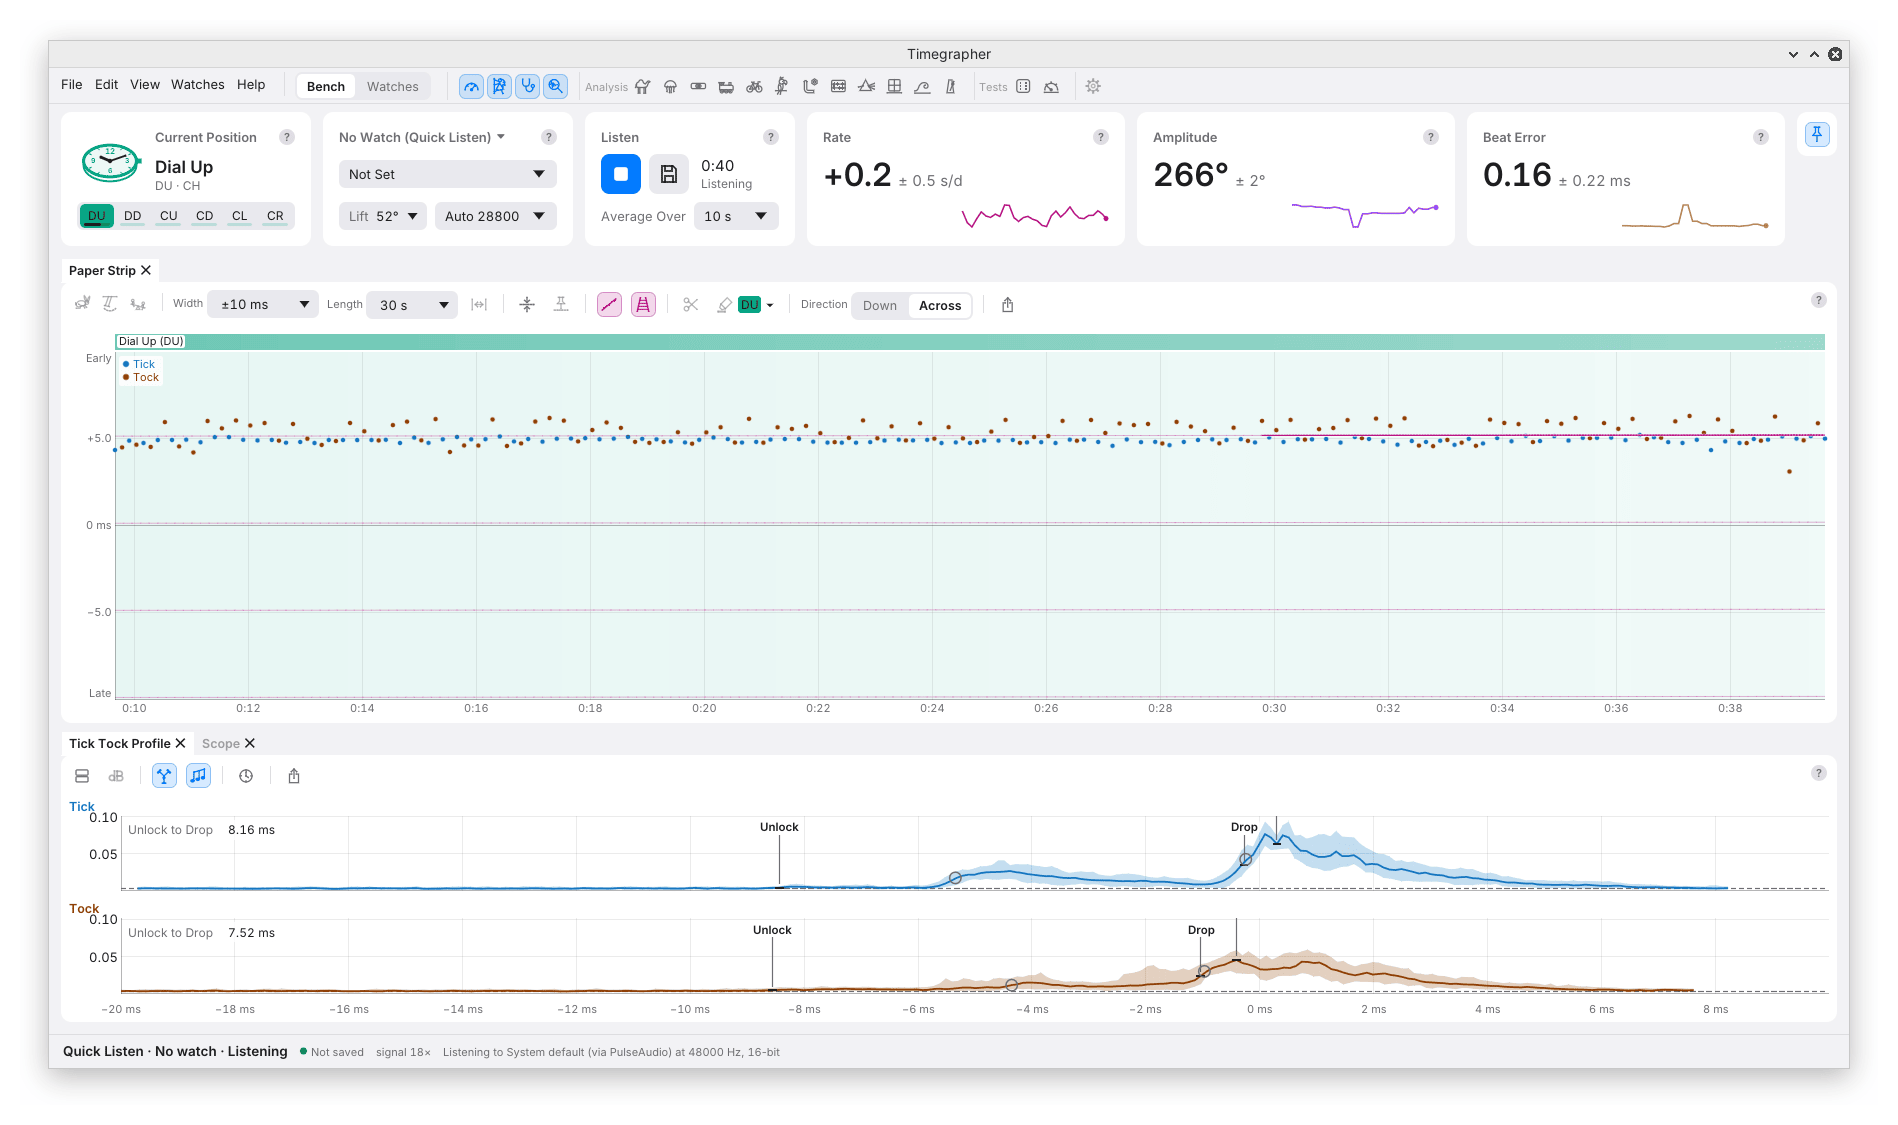
- The Calibre card’s Beat Rate: “Auto 28800” means the app heard 28,800 bph. Check it matches the movement.
- Rate, Amplitude and Beat Error: the figures, each with its ± and a small chart of the take so far.
- Lift 52°: with no calibre set, the app assumes 52°. Pick the calibre on the Calibre card to use its own lift angle. Until then, treat the amplitude as a rough figure.
- The Paper Strip: one dot per beat. A steady rate gives straight tracks. Their slope shows gain or loss. Flat tracks mean the watch is on rate. The gap between Tick and Tock reflects beat error timed from the drop.
- The Tick Tock Profile: the average sound of a Tick and of a Tock, with the Unlock and Drop marks the readings are timed from.
- The status bar: “Quick Listen · No watch · Listening”, whether the take is saved, and the signal: how far the ticks stand above the noise.
Why the Figures Move
- The cards read the last 10 s of beats unless you change Average Over on the Listen card. Some movement in the last digit is normal.
- A repeated pattern, a sudden step or an unsteady strip tells you more than the last digit does.
- The ± is the scatter between short readings. It doesn’t check that the lift angle or the microphone are right.
Stop and Save
Press ■ Stop. The take stays on the Bench to look through, and the microphone is free for other programs. A Quick Listen take isn’t kept until you save it.
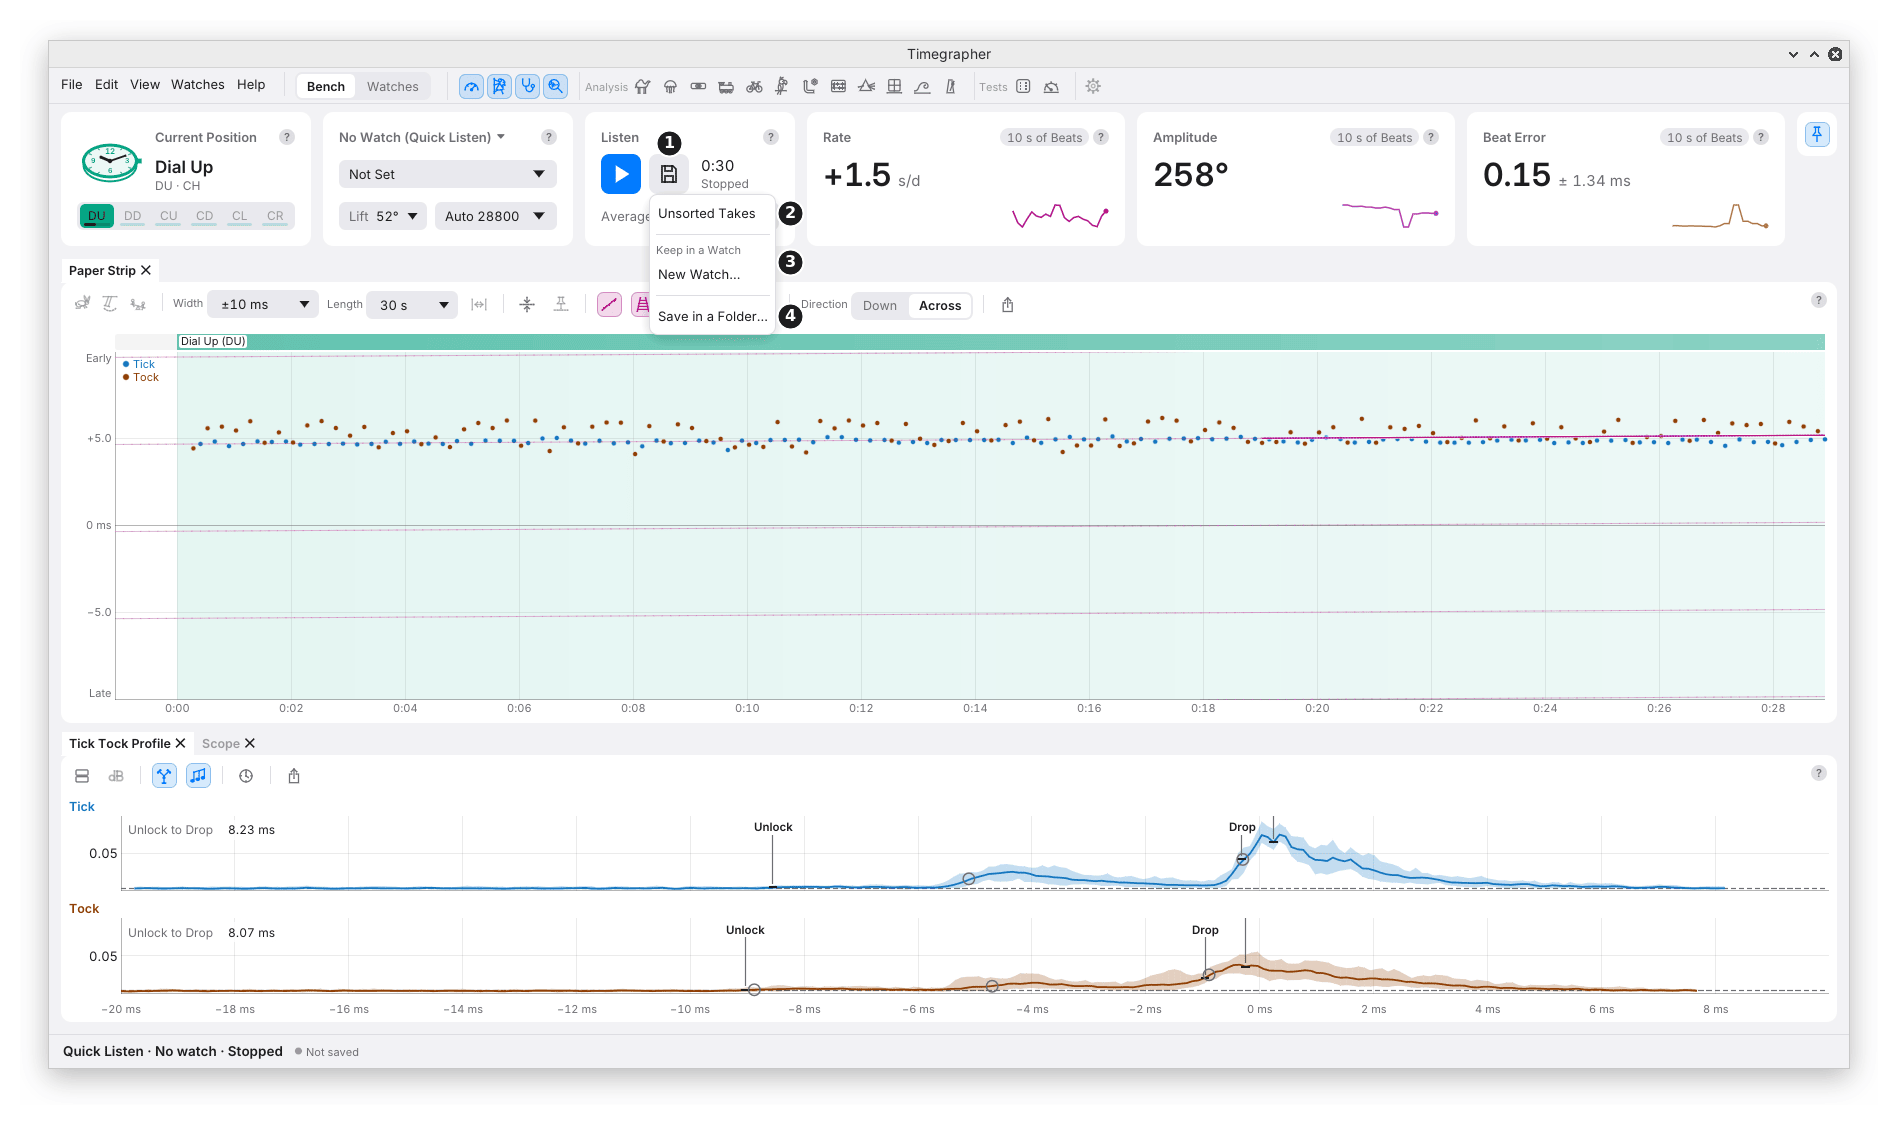
The Save button (the floppy disk beside Listen, mark 1) opens this menu:
| Mark | Choice | What it does | Why you’d use it |
|---|---|---|---|
| 2 | Unsorted Takes | Keeps the take in Unsorted Takes, in the Watches view. | To keep a take now and file it under a watch later. |
| 3 | Keep in a Watch | Lists your watches. New Watch… adds one first. The take takes the watch’s calibre, lift angle and beat rate. | To build a watch’s history and compare its takes later. |
| 4 | Save in a Folder… | Saves the take into a folder you choose. | To keep a take outside your watches, for example to share it. |
- You can also keep a take in a watch while still listening: pick the watch from Keep in a Watch, and listening carries on into it.
- Once kept, the take records into its folder as it goes, every 5 s.
- Listen again starts a new take. An unsaved Quick Listen take goes without a question: save it first if you want to keep it. A test’s take is asked about once more than 5 s of it is unsaved.
Chapters 22, The Watches View, and 23, Takes and Sound Files, cover watches and saving in full.
No Microphone? Open a Recording
- File > Open Recording… opens a WAV or FLAC file (two common sound file formats; FLAC, the Free Lossless Audio Codec, keeps every sample in less space) and analyses all of it at once.
- File > Open Folder… opens a saved take, or a folder of recordings of one long run.
- The public test corpus has recordings to try.
Previous: What a Timegrapher Measures · Next: Setting Up the Microphone
This page comes from the app's user guide at v1.0.1. See it on GitHub.